Here at St Croix 40 Winter Ultra, we want to help you be successful in your entry to winter ultra racing. As a part of this, we want to share with you tips and tricks from people who have been there, in the big races, and have sometimes learned the hard way what works and what doesn’t.
Our next entry comes from Paula Carley, an avid biker in Minnesota. Paula has impressive insight into how to deal with winter conditions, and we HIGHLY recommend anyone who’s considering biking to read this interview through. Thank you Paula for sharing your story!
Thank you for helping us with our Winter Journal!
It is an amazing opportunity to train for and participate in a winter ultra! The racers, directors, volunteers, and supporters are awesome, and winter is so challenging and beautiful! I am thankful to be a part of the community. A couple of years ago when I was first getting into these endurance events, I reached out for advice from those who have much more experience than I do. I am really thankful for the kindness, knowledge, and encouragement that they shared (and continue to share) with me. I still like to ask a lot of questions! Everyone has ideas and stories to contribute, and there is always something new to learn. I love that!
Please briefly list your winter ultra resume
Tuscobia 80 & Arrowhead 135
What’s your favorite piece of gear that might not be on the gear list? (What non-mandatory piece of gear would you not leave home without?)
Can I pick three? ☺
- Raccoon mask: Covers my nose and cheeks when temperatures require. This is really just the top half of a fleece lined neoprene ski mask, which I modified by removing the bottom portion. I wear the raccoon mask in conjunction with a merino wool Buff pulled up over my mouth. The raccoon mask stays put, protecting my nose and cheeks, and the Buff is easy to pull down when I eat or drink. I do carry at least one or two extra Buffs to swap out if the first one gets too frosty, and I pack an extra raccoon mask for the same reason.
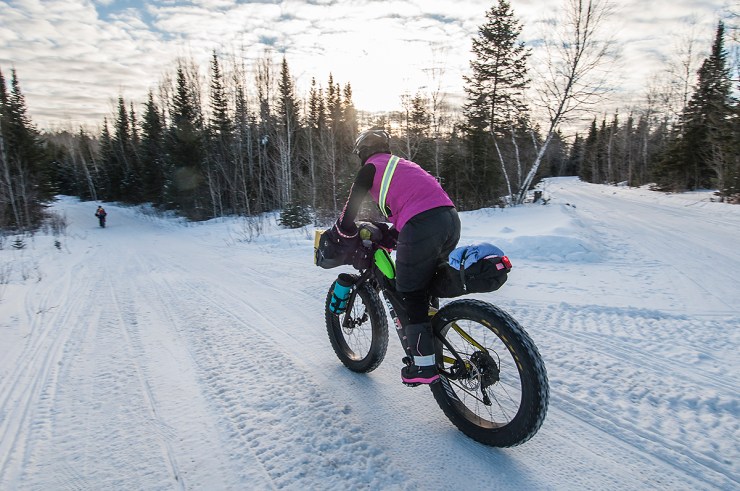
- Puffy down skirt: for me, this offers the perfect amount of extra insulation without adding bulk at my ankles. I wear this while riding, depending on the temps. The skirt is a size or two larger than I would normally wear, so my knees can move up and down freely while pedaling the fatbike.
- BarYak: the backbone in my front-end setup. I can’t say enough great things about it! The BarYak allows me to maintain enough clearance between my gear and the front wheel, and positions my gear out far enough from my handlebars so my cables aren’t mashed up against my headtube. This also means there is plenty of room for my pogies, and extra bar space to mount my light, etc. (BarYak.com)
How many layers do you bring along for a winter ultra? How do you manage multiple layers and sweating for different situations?
I included a list of my most used layers below, but it’s really important to remember that what works for me might not work for you. It’s specific to each person and is dependent on the wild, variable weather conditions. It’s essential that you test your clothing (and all of your gear) for yourself, and race with the layers and the gear that you know works for you. Clothing and gear that you’ve trained with!
I see moisture management and taking care of yourself in varying situations as a matter of being extremely attentive and disciplined out on the course. It’s a full-time job. I have a list of questions that I go through continually in my head. I ask myself these questions, and respond right away based on the answers. This helps me to avoid any problems that I have control over. These questions become instinctual—I don’t necessarily repeat them word for word. But, there are times when I have to remind myself to continue to pay attention to these things!
The list includes questions like these:
- How are my toes?
- How are my fingers?
- Are my fingers or toes beginning to get AT ALL cold?
- How is my face (including nose and cheeks)?
- How is my core?
- Am I beginning to sweat AT ALL?
- Am I getting chilled?
- Do I need to add/remove a layer or adjust a zipper to warm up or cool down?
- Do I need to adjust my level of exertion to warm up or cool down?
- How long has it been since I ate something?
- How long has it been since I drank water?
- Have I smiled lately? I try to remember to smile, stay positive, and be thankful. This helps me to persevere, have fun, embrace the challenge, and stay determined. I look around and enjoy the winter beauty. Sometimes I hum a tune to bring a little melody into the night.
- Did I double check to make sure I blew the water back out of the hose and into the hydration bladder?
- Is the hydration bite valve tucked back away, against my body?
- Are my bags, straps, etc. still attached securely to my bike?
- What is happening around me on the course? (trail markers if applicable, turns, snow pack variations/ruts, temperature/weather changes, etc.)
Work hard to control every variable that you can control (layers, hydration, nutrition, navigation, mind, etc.). There are enough potential variables that may be out of your control, and it’s a good idea to have your reserves available to be able to deal with those things should they arise.
Below is a list of my most used layers, which I adjust/add to/remove/keep based on the temperature and weather conditions. I wondered if it was necessary to include this detailed list, but maybe it will offer some ideas of things to try out for yourself if you’re just beginning to experiment in finding layers that work for you. Remember, what works for one person might not work for another. Find what works for you!
- Head/Face – Smartwool headband, synthetic cap, raccoon mask, merino wool Buff, cycling glasses on and off, helmet, jacket hood when needed, thicker hat option
- Hands – 45NRTH Cobrafist pogies, Answer Chopper mits, and a couple of lighter weight glove options, puffy mittens packed if needed
- Top – Synthetic long sleeve base layer, merino wool short sleeve jersey with full front zipper, (hydration pack on back), thin synthetic vest with tall fleece lined neck and full front zipper, winter weight arm warmers, lightweight hooded windbreaker jacket, puffy coat accessible for stops or other times if needed
- Bottom – Bike shorts, Patagonia Capilene thermal weight capris, Garneau Element women’s pants, puffy down skirt.
- Feet – I’ve been using Baffin Snogoose boots with synthetic or wool knee high socks (I like knee high because this seems to eliminate the problem of my socks slipping down and wrinkling in my boots). I use chemical toe warmers as needed.
In addition to the layers that I ride in, I pack a spare of each layer worn directly against my skin. This spare set fits in a compact, small dry sack that I carry in my seat bag. I’ve never needed to change into these but I feel good knowing that I have them. I would also pack a lightweight rain shell in the event of really wet snow or rain. I bring a hooded puffy coat and spare puffy mittens. They pack well and are very lightweight. I’m considering getting a pair of puffy pants as an option to pack as well for use if needed in extreme temps.

Do you have a favorite brand for certain gear pieces? What do you swear by?
I have a Mountain Hardware puffy coat that I really love. A few of my other favorites are: a Patagonia hooded windbreaker jacket, Patagonia Capilene thermal weight capris, Surly merino wool jersey, and a super comfy synthetic long sleeve base layer that is the REI brand. I also have a pair of knee high socks that I found in a box labeled “FREE” on the sidewalk in Lyons, Colorado. They are my favorite riding socks! I think what is most important, is using quality gear (of the right material) that you’ve tested and know works for you. Gear that is tried and true.
What’s your foot care regimen for preventing blisters, trench foot, frostbite?How do you keep your feet warm while biking, since you’re not moving them the same way as people on foot?
James did a great job answering this question. Once you have a foot system that works for you (the right boots with enough space, the right socks, maybe chemical warmers, maybe a vapor barrier system, etc.), it’s a matter of being attentive to your feet. The MOMENT your toes BEGIN to feel cold, DO something about it IMMEDIATELY. Here are a few suggestions that James also mentioned: get off your bike and walk for awhile, add a chemical warmer or get air to your current warmers, change into dry socks, etc. To avoid wrinkles in my boots, I like wearing socks that come up to just below my knees, because this seems to eliminate (or at least diminish) the problem of the socks slipping down.
 How do you prepare to be a field bike mechanic when it’s -20F? What are the key things people need to look out for, mechanically, when riding in extreme cold?
I think this starts with two things: 1) Having a good understanding of how the systems on your bike work in general, and how to fix them. 2) Being smart in the initial setup of your bike for cold weather functioning.
It’s a good idea to have a solid understanding of the basics. Like, how to fix a flat tire, how to fix (and avoid) a broken chain, how the shift and brake systems work mechanically, etc. Remember—things that might be no big deal to fix in the summer will become exponentially more difficult, if not impossible, to fix in the extreme cold with freezing hands. If you aren’t comfortable troubleshooting and fixing the basic mechanical issues that can happen at any time of the year, I would suggest visiting your local bike shop and asking some questions, or reaching out to a friend who can help to teach you some things. It’s not too difficult to learn how to fix your own bike, but it helps to have someone show you how things work. Out on the course, you are your own local bike shop and you need to be prepared with the knowledge to help yourself. You might need to get creative with a solution, or walk your bike for awhile, if you are unable to resolve the problem completely in the extreme cold—do whatever you can to get yourself moving again to stay warm.
With that said, here are some things specific to cold temperatures to be aware of in the initial setup of your bike. Please keep in mind that this is not meant to be a complete list of every possible concern, but should serve as a good starting point.
- If you have a tubeless tire setup (there are many benefits to this), it’s important to understand how the tubeless system works, and to make sure that you are using a sealant that you are confident with and that will continue to function in extremely cold weather. Make sure to set up your tires ahead of time with the right amount of fresh sealant, and get out for training rides to make sure everything is working properly. If your tires are already set up tubeless, check the sealant and refresh as necessary.
- Regarding brakes: the colder it gets, hydraulic brakes using DOT fluid will function longer before acting up than hydraulic brakes using mineral oil. Mechanical disc brakes will provide the most consistent functionality in dropping temperatures (unless the inside of the housing gets wet and freezes) because with mechanical brakes, it is just a cable doing the work and not hydraulic fluid.
- If you have the funds to choose between carbon and aluminum handlebars, carbon is a good choice as it will transfer less cold to your hands than aluminum.
- Remember that tire pressures will drop when the temperature drops. Also, during training, take time to practice and experiment finding the right tire pressures for varying conditions. Don’t forget to bring a handpump and make sure it works in cold weather. Double check again to make sure it still works!
- Shifters may get sluggish or start acting up in extreme cold. I have experienced this problem. This year I’m giving SRAM Gripshift a try; I’ve heard good things about its consistent performance in the cold. I’m riding a Fatback this year and the Gripshift comes highly recommended on their end. I also like that the Gripshift saves a little space in the pogie and is nice to use with gloves/mittens on.
- Some freehubs can also act up or stop working (slipping or failure to engage in forward motion) if the grease becomes affected by the extreme cold. Really, anything on the bike with grease or fluid has the potential to be affected by the cold and to cause problems. As a good preventative action, or for sure if you experience these issues in cold temperatures during training, you may want to winterize your freehub (and other affected bearings, etc.) using a different grease that will continue to perform well as the temperatures drop. I haven’t experienced the freehub issue personally yet, but others have.
